Restricting TLS 1.2 Ciphersuites in Windows using PowerShell

Before I get started, I’d like to thank Andrei Popov who is the main schannel developer and Candace Jackson who works on the TLS team. Without their help, I would have struggled to put this post together. Also, thanks to my colleague Eric Beauchesne for his review.

In light of known weaknesses in specific TLS ciphersuites, many administrators want to reduce the set of available ciphersuites used by TLS 1.2 to a more secure subset.

The two main ways to set TLS ciphersuite policy in Windows are:

  • Use Group Policy
  • Use PowerShell

I am going to focus on the latter, and I tested this on Windows Server 2019 version 1809, current builds of Windows Server 2022, Windows 10 and Windows 11 will also work.

Use TLS 1.3

I want to stress that where possible, you need to use TLS 1.3, but sometimes, because of compatibility issues, you might not be able to, so you need to use TLS 1.2 with a more secure set of ciphersuites.

Selecting TLS 1.2 Ciphersuites

So, the first question is what determines a safer ciphersuite? For the answer I turned to NIST SP 800-52r2 (link) which describes preferred TLS 1.2 ciphersuites:

Section 3.3.1.1 “Cipher Suites for TLS 1.2 and Earlier Versions” states the following preferences when selection ciphersuites:

  1. Prefer ephemeral keys over static keys (i.e., prefer DHE over DH (Diffie Hellman), and prefer ECDHE over ECDH (Elliptic Curve Diffie Hellman)). Ephemeral keys provide perfect forward secrecy.
  2. Prefer GCM or CCM modes over CBC mode. The use of an authenticated encryption mode prevents several attacks (see Section 3.3.2 for more information). Note that these are not available in versions prior to TLS 1.2

Prefer CCM over CCM_8. The latter contains a shorter authentication tag, which provides a lower authentication strengths.

Using PowerShell

There’s a set of PowerShell cmdlets that can interrogate and set ciphersuites, they are documented here. We will use these cmdlets to change the ciphersuite settings on a Windows PC.

But before we get started, we need to change a registry setting to make sure the PowerShell changes take effect.

Load up regedit and delete this key.

HKEY_LOCAL_MACHINE\SOFTWARE\Policies\Microsoft\Cryptography\Configuration\SSL\00010002

I don’t think you need to reboot; I have tested with no reboot, and it all worked fine.

Now, let’s get a list of default ciphersuites. To do this, run:

Get-TlsCiphersuite | fw

And this is what you will see:

TLS_AES_256_GCM_SHA384
TLS_AES_128_GCM_SHA256
TLS_ECDHE_ECDSA_WITH_AES_256_GCM_SHA384
TLS_ECDHE_ECDSA_WITH_AES_128_GCM_SHA256
TLS_ECDHE_RSA_WITH_AES_256_GCM_SHA384
TLS_ECDHE_RSA_WITH_AES_128_GCM_SHA256
TLS_DHE_RSA_WITH_AES_256_GCM_SHA384
TLS_DHE_RSA_WITH_AES_128_GCM_SHA256
TLS_ECDHE_ECDSA_WITH_AES_256_CBC_SHA384
TLS_ECDHE_ECDSA_WITH_AES_128_CBC_SHA256
TLS_ECDHE_RSA_WITH_AES_256_CBC_SHA384
TLS_ECDHE_RSA_WITH_AES_128_CBC_SHA256
TLS_ECDHE_ECDSA_WITH_AES_256_CBC_SHA
TLS_ECDHE_ECDSA_WITH_AES_128_CBC_SHA
TLS_ECDHE_RSA_WITH_AES_256_CBC_SHA
TLS_ECDHE_RSA_WITH_AES_128_CBC_SHA
TLS_RSA_WITH_AES_256_GCM_SHA384
TLS_RSA_WITH_AES_128_GCM_SHA256
TLS_RSA_WITH_AES_256_CBC_SHA256
TLS_RSA_WITH_AES_128_CBC_SHA256
TLS_RSA_WITH_AES_256_CBC_SHA
TLS_RSA_WITH_AES_128_CBC_SHA
TLS_RSA_WITH_3DES_EDE_CBC_SHA
TLS_RSA_WITH_NULL_SHA256
TLS_RSA_WITH_NULL_SHA
TLS_PSK_WITH_AES_256_GCM_SHA384
TLS_PSK_WITH_AES_128_GCM_SHA256
TLS_PSK_WITH_AES_256_CBC_SHA384
TLS_PSK_WITH_AES_128_CBC_SHA256
TLS_PSK_WITH_NULL_SHA384
TLS_PSK_WITH_NULL_SHA256

This is a list of all the supported ciphersuites in Window Server 2019 in preferred order. That’s a lot of ciphersuites!

You can get a list of ciphersuites available in various versions of Windows here.

The top two ciphersuites that start TLS_AES are TLS 1.3 only, note they only focus on the bulk encryption cipher (AES) and HMAC (SHA256 or SHA384), this was a big change made in TLS 1.3 to ciphersuite naming, the key exchange and certificate signature algorithms are set by the TLS 1.3 standard.

The rest are all TLS 1.2 only, and this is the set we’re going to update using PowerShell.

Using the NIST recommendations, we end up with this tiny list:

TLS_AES_128_GCM_SHA256
TLS_ECDHE_ECDSA_WITH_AES_256_GCM_SHA384
TLS_ECDHE_ECDSA_WITH_AES_128_GCM_SHA256
TLS_ECDHE_RSA_WITH_AES_256_GCM_SHA384
TLS_ECDHE_RSA_WITH_AES_128_GCM_SHA256

I want to make it abundantly clear that this is an aggressive list, and you might have compatibility issues with some servers or clients. So, if some code fails to connect, you might need to add ciphersuites back to the list.

The really nice thing about using these PowerShell cmdlets to manipulate the ciphersuites is there is no need to reboot.

Here’s some sample code I wrote to reduce the list of ciphersuites:

set-strictmode -Version latest
$cs = Get-TlsCipherSuite

$csOk = 'TLS_AES_256_GCM_SHA384', 
        'TLS_AES_128_GCM_SHA256', 
        'TLS_ECDHE_ECDSA_WITH_AES_256_GCM_SHA384', 
        'TLS_ECDHE_ECDSA_WITH_AES_128_GCM_SHA256', 
        'TLS_ECDHE_RSA_WITH_AES_256_GCM_SHA384',
        'TLS_ECDHE_RSA_WITH_AES_128_GCM_SHA256'

foreach ($c in $cs) {
    if ($csOk.Contains($c.Name)) {
        $c.Name + ' Valid - Enable' 
        Enable-TlsCiphersuite -Name $c.Name
    } else {
        $c.Name + ' Disable'
        try {
            Disable-TlsCiphersuite -Name $c.Name
        } catch {
            $PSItem.Exception.Message
        }
    }
}  

Basically, if a ciphersuite is not in the list $csOk, then the ciphersuite is disabled.

After running this, run Get-TlsCipherSuite one more time and you’ll see the reduced list. If you do not see a reduced list, then you did not purge the reg key I mentioned earlier!

From here on, any code that uses the Windows TLS settings (ie; schannel) will only use TLS 1.3 with two ciphersuites, and TLS 1.2 with four. If some code tries to connect with TLS 1.1, or TLS 1.2 using a ciphersuite not in the list, like TLS_RSA_WITH_3DES_EDE_CBC_SHA, it will fail.

Sometimes failures happen, and you might need to understand why. Thankfully, there is schannel logging which will let you know why it failed. This article Enable Schannel event logging in Windows – Internet Information Services | Microsoft Docs will explain how to set schannel logging and where to find the data. Set the value to 7 as this will give you failures and successes.

If you really are having a hard time working out why a connection fails, you could re-enable all the ciphersuites in the original list, attempt to connect and then look at the schannel log to see which ciphersuite was used. This code will set you back to normal without some of the cruft.

set-strictmode -Version latest

$cs = 'TLS_AES_256_GCM_SHA384',                    
  'TLS_AES_128_GCM_SHA256',
  'TLS_ECDHE_ECDSA_WITH_AES_256_GCM_SHA384',
  'TLS_ECDHE_ECDSA_WITH_AES_128_GCM_SHA256',
  'TLS_ECDHE_RSA_WITH_AES_256_GCM_SHA384',     
  'TLS_ECDHE_RSA_WITH_AES_128_GCM_SHA256',
  'TLS_DHE_RSA_WITH_AES_256_GCM_SHA384',       
  'TLS_DHE_RSA_WITH_AES_128_GCM_SHA256',
  'TLS_ECDHE_ECDSA_WITH_AES_256_CBC_SHA384',
  'TLS_ECDHE_ECDSA_WITH_AES_128_CBC_SHA256',
  'TLS_ECDHE_RSA_WITH_AES_256_CBC_SHA384',     
  'TLS_ECDHE_RSA_WITH_AES_128_CBC_SHA256',
  'TLS_ECDHE_ECDSA_WITH_AES_256_CBC_SHA',      
  'TLS_ECDHE_ECDSA_WITH_AES_128_CBC_SHA',
  'TLS_ECDHE_RSA_WITH_AES_256_CBC_SHA',        
  'TLS_ECDHE_RSA_WITH_AES_128_CBC_SHA',
  'TLS_RSA_WITH_AES_256_GCM_SHA384',           
  'TLS_RSA_WITH_AES_128_GCM_SHA256',
  'TLS_RSA_WITH_AES_256_CBC_SHA256',           
  'TLS_RSA_WITH_AES_128_CBC_SHA256',
  'TLS_RSA_WITH_3DES_EDE_CBC_SHA'

foreach ($c in $cs) {
    try {
        'Enabling ' + $c
        Enable-TlsCiphersuite -Name $c
    } catch {
        $PSItem.Exception.Message
    }
}

Please don’t judge me on the inclusion of 3DES_EDE_CBC_SHA in the list!

This code will raise an exception if it attempts to enable an already enabled ciphersuite, but the exception handler will make sure it keeps on trucking.

This is what a successful TLS connection looks like in the schannel log:

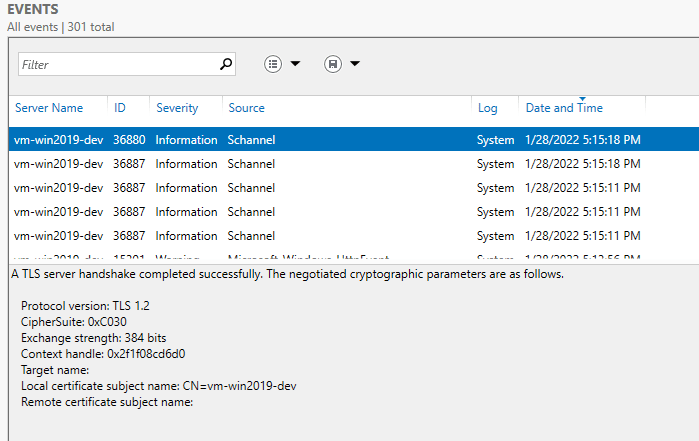
Note the ciphersuite – the name of the ciphersuite is not given, rather the value is used. 0xC030 is TLS_ECDHE_RSA_WITH_AES_256_GCM_SHA384. You can see a complete list of these values here.

.NET TLS Coding Best Practices

One parting thought. If you have custom .NET code, and you set your TLS config in code please make sure you read this.

Many devs hard-code TLS 1.2 which means your code can NEVER use TLS 1.3. Rather than forcing TLS 1.2 in your code, you should offload the TLS configuration to Windows.

You will also make life easier for yourself if you target .NET 4.8 or .NET Core.

I realize this is a lot of material and quite complex, but I hope you find it useful. If there’s anything missing or not obvious, please let me know and I will address it.

– Michael

My List of Security Announcements from Build 2021

General availability: Azure RBAC for Kubernetes Authorization in AKS <link>

General availability: Encryption at host support in AKS <link>

Preview: AKS support for FIPS compliant nodes <link>

Building Well-Architected secure applications with Azure <link>

Scaling DevSecOps with GitHub and Azure <link>

Application Authentication in the Microsoft Identity platform <link>

Build secure B2C applications​ with Azure AD External Identities <link>

Securely managing cloud applications <link>

Build Zero Trust ready applications starting with the Microsoft identity platform <link>

Down with sign-ups, just sign-in! <link>

Azure Cosmos DB role-based access control (RBAC) now in general availability <link>

Always Encrypted for Azure Cosmos DB in public preview <link>

Public preview: Azure Confidential Ledger <link>

Azure SQL Database ledger available in public preview <link>

Securely managing sensitive data in the cloud <link>

How to use Azure Confidential Computing using Intel SGX to protect apps and solutions in the cloud <link>

Signal Customer Story <link>

Build Secured IoT Solutions for Azure Sphere with IoT Hub <link>

The Best Security Advice I Can Give…

The title isn’t click-bait, I promise! I sincerely believe what I am going to write next.

The best security advice I can give you is this:

“Pick your security battles”

Ok, so it’s a little more complex than that, but it’s a start. So let me explain.

Security people have the horrible need to require all security issues be fixed just because they are security issues and they are willing stop deployment of critical business systems until they are fixed.

At this point you probably think I am a security heretic. I am not! Let me explain with an example.

Many years ago a product team came to me to ask me to help them get a security bug through the Windows War Room. We were at a point where every bug had to pass War before being accepted into the product. Every bug was a surgical fix. I took a look at the bug and said, “nope!”

The program manager said, “but it’s a security bug, it’s a memory corruption bug and you don’t think we should get it fixed?”

I said, “sure it should be fixed, but it’s a quality issue and not a security bug, it’s not critical and does not put customers at risk. So no, not at this point in the release.”

The issue was a memory corruption bug in a command-line tool parsing a command-line argument. Also, it was a one-byte overrun and the way the code worked, the argument could only be numeric. Also, the issue was picked up by the Visual C++ /GS stack-based overrun detection code and address-space layout randomization (ASLR) was enforced for the app.

The lesson here is:

“Not all bugs are created equal.”

Sure, it’s memory corruption, and it was eventually fixed, but it’s not a serious security issue. Now image a scenario where the corruption is in code running as admin/root listening on an unauthenticated UDP endpoint on the internet! That’s a no brainer. In fact, I’d ask why did this get in the code in the first place.

The ‘analysis technique’ I often apply is:

“What does the attacker control, and who is the attacker?”

Let’s take the first scenario. The attacker controls an argument to a command-line tool, and the attacker can only use numbers (0-9). The attacker is either a user encountering the memory corruption, in which case the ensuing crash affects only the user. Or, the attacker is potentially someone on the Internet convincing a user to the run app with the overlong argument. If an attacker can get a user to run some arbitrary code, then the attacker get the user to run, well, any arbitrary code!

You can often determine the level of attacker control by looking at the entry-point’s attack surface, such as local vs remote and authenticated vs anonymous and user access vs admin access.

And we haven’t touched the various mitigations that came into play.

I often show the following example to hammer the point home.

Look at this C code, let’s assume it’s in a Windows command-line tool.

void func() {
   char buf[4];
   buf[4] = 0;
}

This is a memory corruption bug (padding aside) because the code writes to the 5th element of a four-byte array (remember, arrays start at zero in C.) And for the smarty-pants out there, I realize that this code, as-is, would be removed by the optimizer. But humor me.

We can agree it’s a memory corruption issue, but is it a security bug? No! The attacker controls NOTHING. The index into the array is a constant. The value is a constant. The attacker controls zip.

Okay, let’s take the same code but spice it up a little.

void func(int index, int value) {
   char buf[4];
   buf[index] = value;
} 

Let’s assume the arguments index and value come from a call to recv() which reads a packet from the Internet. Is this a security bug? Heck yeah. The attacker controls everything about that poor old buffer. Even with /GS and ASLR in place, this would be a serious bug and would be fixed at the earliest.

So there you have it – pick your battles, because not all bugs a created equal, and to determine what needs to be fixed understand what the attacker controls.

– Michael

Please be pedantic when talking about cryptography

It’s not uncommon when building a threat model or reviewing the design of a system that the topic of cryptography comes up. I just looked at some notes from the last four weeks, and in that time I reviewed seven cryptographic designs.

I also remember that in each of those meetings, I said, “Fair warning, in this call I will be specific with my wording when it comes to crypto, so don’t be surprised when I ask you to be specific, too!”

Or something similar.

I am pedantic with my wording especially when it comes to crypto and you should too! Why? Because it’ll help everyone understand if the system is designed correctly or not and it removes ambiguity.

Here are some examples.

“We will encrypt the data with the key.” My response is “which key?”

“We encrypt the certificate.” My response is, “You encrypt the cert or the private key associated with the certificate? Because there’s no need to encrypt the certificate.”

Or, my favorite when there’s a hierarchy of keys, “We will rotate the key every two years.” My response is again, “Which key?” Rotating a key encryption key (KEK) is easy, but rotating the data encryption key(s) (DEK) is hard when you have millions of rows of data. But that’s a discussion for another day.

I could keep going, but these are some common comments I hear.

So please be specific when talking about cryptography, especially keys!

Revisiting some thoughts from almost 20 years ago

Before you start reading this, I want to point out that there is no point to this article other than to revisit something I wrote almost 20 years ago and the fact that it’s as true today as it was ‘back then.’

When I look back on my career, one event that really stands out is co-authoring Writing Secure Code with my good friend David LeBlanc. At the time, he was in Office and I was in Windows. The first edition was about 500 pages long and then we wrote the 2nd edition in 2002-2003 and it was almost a complete re-write of the book at 815pp.

During these years, the impact of the 9/11 attacks on the US made terrorism front-and-center and people thought more about asymmetric warfare. This got me thinking about what is it that makes it so hard to protect systems from attack and exploit? One answer is “Asymmetry”.

Internet-based attacks are obviously an asymmetric concern, just like terrorism.

So, while writing Writing Secure Code 2nd Ed, and in the interests of coming up with a catchy phrase, I came up with:

The Attacker’s Advantage and the Defender’s Dilemma

Catchy isn’t it? 🙂

The four principles are:

  • Principle #1: The defender must defend all points, the attacker can choose the weakest point.
  • Principle #2: The defender can only defend against known attacks; the attacker can probe for unknown vulnerabilities.
  • Principle #3: The defender must be constantly vigilant; the attacker can strike at will.
  • Principle #4: The defender must play by the rules; the attacker can play dirty.

Essentially, all these principles hark back to asymmetric conflict.

This asymmetry favors attackers and sadly, as defenders, we are always on the back foot. Which simply means we have to do more to protect our systems from attack.

You might be wondering what on earth made me think of something from 20 years ago? A topic was brought up on LinkedIn by another friend and ex-colleague, Adam Shostack. This is what jogged my memory.

Take a look at the article and I think you’ll agree “The Attacker’s Advantage and the Defender’s Dilemma” is as true today as it was 20 years ago when David and I wrote WSC 2nd Ed.

-Michael

The Relationship Between Keys, Secrets and Certificates in Azure Key Vault

I decided to write this post based on some customer confusion when using Azure Key Vault. I hope this can help put a little more visibility into how Azure Key Vault (AKV) works.

AKV is an Azure Platform as a Service (PaaS) technology that can store and manage secret data in a secured and audited environment. It is a critical component of every solution I have worked on in the last few years. The general rule of thumb for storing any secret data in Azure is to use Key Vault.

Please note, there is another service named Azure Key Vault Managed HSM. I won’t get into the specifics about this new product. That’s a topic for another day.

AKV can store three distinct data types:

  • Keys
  • Certificates
  • Secrets

Let’s look at each in a little detail.

Keys

A key in AKV is either an RSA key or an Elliptic Curve (EC) key which are both asymmetric algorithms. Asymmetric means there’re two keys: a private key and a public key, the two are mathematical related but you cannot deduce one knowing the other.

The screen shot below shows the two key types RSA or EC and the fact that you can opt to store the keys in hardware (HSM keys, Hardware Security Module) rather than software.

Figure 1 Creating a Key in Key Vault, note there are two algorithm types – RSA or EC and two storage types HSM (Hardware Security Module) and non-HSM

AKV can perform various cryptographic operations within AKV such as encrypt/decrypt and sign/verify using RSA/EC keys. There is a subtle nuance about some operations and you can read about that topic in a previous post.

Certificates

Certificates are X.509 v3 certificates and associated private keys. Remember, the public key is in the certificate. The job of a certificate is to bind a name to a public key.

Note, you can’t store JUST the certificate, you must include the private key, too. When importing a certificate and private key, the most common data formats are PEM and PKCS 12. PKCS 12 and Microsoft’s PFX are the same format so if you’re having an issue importing a .P12 file into AKV in the Portal, just rename to file to .PFX and you should be good to go.

Secrets

A secret is anything that’s sensitive that’s not an asymmetric key or a certificate, such as:

  • An 256-bit AES symmetric key
  • A database connection string
  • A Kubernetes secret
  • An Application token

It’s important to point out that you can store AES keys in Key Vault, but they are really just a series of bytes, AKV doesn’t know they are AES keys.

If you look at the list of actions you can perform that apply to secrets, there’re no cryptographic operations that can be performed by AKV. Take a look for yourself here. No crypto operations. Now look at the list of operations for Keys, and you’ll see a number of crypto operations such as decrypt and sign.

So we’ve covered all three data types that can be stored in Key Vault: keys, certificates and secrets.

As noted, a certificate is really two items – a certificate and a private key.

Now here’s the fun part. When you store a certificate, the Key Vault Portal experience will only show the certificate. You can try it yourself. Head over to the Azure Portal, create a Key Vault and then create a self-signed cert (yes, I know, I know… never use self-signed certs! But we’re testing something here, not deploying certs in production!)

Once the cert is created, you’ll notice the cert listed under Certificates, but there is nothing shown under Keys nor Secrets.

Heads up, we’re using the Azure CLI from now on. More info here Manage Azure Key Vault using CLI – Azure Key Vault | Microsoft Docs.

Now go open an Azure CLI, and use the az keyvault certificate show command (az keyvault certificate | Microsoft Docs). For example, for my certificate, I used:

az keyvault certificate show --id https://xyzzy42.vault.azure.net/certificates/testcert/d60ac807d99d4743bbe51f23b10edff9

This outputs a bunch of really interesting data:

Figure 2: Output of az keyvault certificate show

I want to point out a few data items.

  • cer is the base-64 encoded certificate.
  • kid is the URL to the private key associated with this certificate.
  • sid is the URL to the public key held within the this certificate.

So now that we have the URL to the public key (it’s in the sid variable), we can view it using az keyvault secret show command (az keyvault secret | Microsoft Docs). Technically, the public key is not a secret, but I guess the data has to go somewhere!

Figure 3: Public key data

We can also use az keyvault key show (az keyvault key | Microsoft Docs) to get to the private key info:

Figure 4: Private key data

You can also use PowerShell to access KV data, using cmdlets like get-azkeyvaultkey (Get-AzKeyVaultKey (Az.KeyVault) | Microsoft Docs) and get-azkeyvaultsecret (Get-AzKeyVaultSecret (Az.KeyVault) | Microsoft Docs).

Summary

A certificate in Key Vault is not just a certificate, it must be a cert AND the associated private key. The certificate is accessible in the Certificates collection in the Portal UI. The private key and the public key are not exposed in the Portal UI, but they are exposed via the REST API, usually using the Az CLI or PowerShell or even custom code calling into the REST APIs.

The Curious Case of the “Un-Enforced” Azure Key Vault RBAC Policy

I want to preface this post with a small, but important comment: there is absolutely no vulnerability here. If you’re looking for some dirt, you won’t find any, and as you read through this, you’ll hopefully realize what’s going on and maybe learn a little about Azure RBAC policy and asymmetric crypto in general.

I guess the title is a little ‘click-baity’ 🙂

The ‘Issue’

I wrote some C# code that encrypts and decrypts data using Azure Key Vault APIs. It’s pretty simple, you can grab the source from https://github.com/x509cert/AzureKeyVault.

In the screenshot below, an exception is raised calling cryptoClient.Decrypt() on line 60, but to get to this point in the code, cryptoClient.Encrypt() has been called on line 55 and it succeeded.

Figure 1: Exception raised on Decrypt(), but not on Encrypt()

So what?

If you take a look at the RBAC policy for my account, you can see I DO NOT HAVE the ability to Decrypt nor Encrypt:

Figure 2: My Access Policy for this Key Vault, I should not be able to encrypt nor decrypt

In short, my account:

  • Does not have the Key Encrypt right, but my code can encrypt (not expected)
  • Does not have the Key Decrypt right, and my code cannot decrypt (expected).

So what’s going on?

Digging In

Let’s start at the beginning with some pertinent details, if you know Azure RBAC and Azure Key Vault well, you can probably jump straight to the “Why Is the Key Encrypt Policy not enforced” section.

  1. Azure Key Vault stores and manages three kinds of items: Keys, Secrets and Certificates.
  2. Key Vault keys are only asymmetric RSA or Elliptic Curve keys.
  3. Keys are real keys used for signing/verifying, wrapping/unwrapping and encryption/decryption.
  4. RSA and Elliptic Curve keys are asymmetric, comprised of a public key and a private key.
  5. The public key is, well, public!
  6. Because the public key is public, it does not need to be securely stored.
  7. The private key is, you guessed it, private.
  8. It’s imperative that private keys be protected, preferably directly in hardware or encrypted using hardware-backed keys.
  9. Only RSA keys can encrypt, sign and wrap; Elliptic Curve keys can only sign (this is an algorithm issue and has nothing to do with Key Vault)
  10. Key Vault provides multiple layers of defense, including network isolation, IP restrictions, authentication and authorization.
  11. One form of authorization is role-based access control, or RBAC.
  12. RBAC policies can be defined at the data-plane (to control day-to-day use of the service) and at the control-plane (to control management of the service).
  13. Key Vault has fine-grained RBAC controls for Keys, Secrets and Certificates at both the data-plane and the control-plane.

Make sure you thoroughly understand the list above before you move on.

Let’s dig into RBAC policy a little. If you look at https://docs.microsoft.com/en-us/azure/role-based-access-control/resource-provider-operations#microsoftkeyvault you will notice there’re two possible Action Types:

  • Action
  • DataAction

‘Action’ includes RBAC policy options at the control-plane (ie; Delete a Key Vault) and ‘DataAction’ includes RBAC policy options at the data-plane (ie; Read a key.)

Here are some examples. First some control-plane policies:

ActionMicrosoft.KeyVault/vaults/readView the properties of a key vault
ActionMicrosoft.KeyVault/vaults/writeCreate a new key vault or update the properties of an existing key vault
ActionMicrosoft.KeyVault/vaults/deleteDelete a key vault
Table 1: Sample Azure Key Vault Action policies

And some data-plane policies:

DataActionMicrosoft.KeyVault/vaults
/keys/encrypt/action
Encrypt plaintext with a key. Note that if the key is asymmetric, this operation can be performed by principals with read access.
DataActionMicrosoft.KeyVault/vaults
/keys/decrypt/action
Decrypt ciphertext with a key.
DataActionMicrosoft.KeyVault/vaults
/keys/delete
Delete a key.
Table 2: Sample Azure Key Vault DataAction policies

Why Is the Key Encrypt Policy not enforced?

So let’s get back to the opening question. Why can my code encrypt data when my account does not have the right to do so?

The answer is:

The encryption is not performed by Key Vault,
it’s performed by the Key Vault SDK code.

Why?

There is no need to perform the encryption operation in Key Vault because:

Asymmetric encryption uses a public key.

The public key is public! Remember the list at the start of this post, items 5 and 6? In theory, anyone can use the public key to encrypt, but it takes the private key to decrypt.

The decryption operation is performed by Key Vault and hence there is an RBAC policy check. In other words:

We must protect the decrypt operation because it uses a private key.

Remember, today Key Vault keys are always asymmetric. If you’re wondering if Key Vault can store AES keys, it can, but they are stored as secrets, not keys, and because they are secrets, they cannot be used by Key Vault to perform encryption/decryption. You can pull the secret from Key Vault into your code and perform AES crypto in your code. Your code would then be subject to a different bucket of RBAC policies:

Figure 3: RBAC Policies that apply to Secrets in Key Vault

If you must block someone from reading a public key from Key Vault, you can remove the Get Key role from their access policy:

Figure 4: Denying the ability to read a key

On a side note, you can see that only the decrypt operations are performed in Key Vault by looking at the logs using Azure Monitor:

Table 3: Key Vault audit logs

Finally, this situation is described in the description of the Microsoft.KeyVault/vaults
/keys/encrypt/action RBAC policy: “Encrypt plaintext with a key. Note that if the key is asymmetric, this operation can be performed by principals with read access.”

In Summary

Technically, the Key Encrypt RBAC policy in Key Vault is not needed when using asymmetric encryption because anyone and everyone can access the public key, other Key Vault defenses aside.

If you can read the key, you can encrypt with it and encryption outside of Key Vault is not the purview of Key Vault.

The Key Decrypt RBAC policy is needed to decrypt because the decrypt operation requires access to the private key, and that’s a trusted operation performed by Key Vault.

TL;DR: This is working as intended!

Big thanks to Heath Stewart, Hervey Wilson and Scott Schaab on the Key Vault team for their valuable assistance and feedback.

Thoughts on Passing AZ-500

Well, I passed AZ-500 about 60mins ago. All I can say is I feel relieved to have it behind me, because it’s a beast.

IMPORTANT: I am neither confirming nor denying that any of the material below was in the exam. This is material I learned along the way, however.

AZ-500 is the current Azure Security exam, you can read more about it here.

Now, you’re probably thinking, “Aren’t you a security guy at Microsoft? Shouldn’t this be easy for you?” The answer is an emphatic, resounding, vigorous “nope.”

The reason it’s hard isn’t because I don’t know the subject matter; ok, sure, there’re some parts of Azure I know zip about, for example, I know what Privileged Identity Management (PIM) is, but until studying for AZ-500 that was the extent of my knowledge. The reason it’s hard is because of all the subtle nooks and crannies within Azure generally, and Azure Security specifically.

Here are some examples.

So you decide to study Key Vault in depth, which is a great idea. But do you understand the limitations of using Key Vault with various other Azure services. In different regions? In different resource groups?

Do you understand the specific RBAC requirements when pulling containers from Azure Container Registry? Like did you know that the AcrPull role can pull containers, but so can the AcrPush role? Don’t believe me? Take a look. And if you still don’t believe me, go take a look at all the RBAC scopes for AcrPush in the Azure Portal. And if you don’t know how to do that last point, you really ought to know!

Do you know the folder permissions required on a parent folder when using POSIX 1003.1 ACLs on Azure Data Lake Storage Gen 2 volumes?

Do you truly understand the relationships between ASGs, NSGs, subnets and VNets? Now throw VMs into the mix and consider virtual NICs. One thing I learned along the way is an NSG can be assigned to more than one VNIC.

Learning a service in isolation is only the starting point, you absolutely need to understand how the services work together.

Me Adding Some Value

So this is where I think I can add some value if you want to pass AZ-500.

There’re plenty of good classes out there you can take, here’re two I used:

They are both good. I did not go over each from start-to-end, however; I started by focusing on the areas I knew little about. Like PIM! I looked at the PIM material in Udemy and then in WhizLabs. I also had the sessions on my phone so I could listen in the car. It may be boring, but it’s way more uplifting than listening to the news!

But the courses themselves are not enough; I also replicated the material in my own subscriptions. I learn by doing, not watching or reading. After I had looked at PIM in both classes, I jumped into the Azure Portal and did the work. The most important learning experience is when something didn’t work, because then you REALLY need to understand how it works as you figure out why it failed.

Sure, it takes longer doing it this way, but it cemented the service details in my head.

My other source of learning was good ol’ docs.microsoft.com; this repo has list of the AZ-500 requirements and links to appropriate material at the docs site. Keep this repo handy!

I had a thick pile of printed material, especially on features I was not 100% familiar with. Like PIM! Right before the exam I read through all the printed material. By “right before” I mean all the way up to 30secs before logging on to take the exam!

Finally, I took sample tests, and if I failed a question (that happened a lot!), I printed out the correct answer and made sure I understood why I got it wrong. I mainly used http://www.measureup.com/ for this.

Here’s the TL;DR:

  • Watch AZ-500 videos
  • Read docs.microsoft.com
  • Focus on the parts of Azure Security you don’t know well
  • Make sure you understand the relationships BETWEEN services
  • Spend most of your time in the Azure portal doing stuff.

In summary, I am happy I have AZ-500 behind me. I probably spent around 60 hours studying for this, spread over a couple of months.

All the best if you take the exam.

I think I will do AZ-204 next 🙂

PS: We started an Azure Security Podcast! https://azsecuritypodcast.net/

Make sure you understand what Azure SQL Database Transparent Data Encryption (TDE) mitigates

Encryption of data at rest is one of the most important defenses we have in our architectural arsenal. When firewalls, authentication and authorization fail, correctly encrypted data gives the attacker nothing but a jumble of valueless bytes.

Leaked data is bad, but correctly encrypted data is substantially less worse.

I really want to stress ‘correctly encrypted’, by this I mean appropriate algorithms, keys, key derivation, key length, key storage etc.

This brings us to SQL Server Transparent Data Encryption (TDE).

Please note that TDE-type technology exists in other database engines, not just SQL Server.

What TDE Does

TDE was first introduced in SQL Server 2008 and allows an administrator to configure SQL Server so that it automatically encrypts and decrypts data at rest. The key word in the last sentence is ‘automatically.’ No code updates are needed whatsoever, no updates to client code, triggers, or stored procedures. It all ‘just works.’

But this is where knowing what TDE is designed to mitigate is critical. TDE mitigates a stolen drive or database file. If an attacker accesses a TDE-encrypted database (ie; tables etc) perhaps through a SQL injection attack, then the bad guy will get plaintext not ciphertext. This is the ‘transparent’ aspect of TDE.

Let me say that last part again, because it’s important:

TDE + SQLi == Plaintext

The Value of TDE

If the attacker can read the database file directly (eg; database.mdf), for example via a directory traversal vulnerability at the server, then they will only get ciphertext back, because SQL Server does not decrypt the data automatically.

Note this last point is also true for a database backup. It’s encrypted using TDE even when held in another location away from the SQL Server database itself.

I would argue that when using Azure SQL Database (the PaaS version, not SQL Server IaaS, that resides in a Windows or Linux VM), the value of TDE in a stolen hard drive scenario is considerably lower than on-prem. TDE provides protection against a lost or stolen disk, and Azure takes physical custody of the disks seriously; and while these scenarios are unlikely, mistakes happen, and TDE provides an extra defensive layer.

As a side note, you can read more about Azure data center physical security here.

If you use TDE, then you should use it in conjunction with keys you manage, that way if you know of an attack you can pull the keys or deny access to the keys. This way, the attacker has access only to cipher text once you pull the keys because SQL Server no longer has access to the keys. It’s not perfect, but it’s better than the attacker getting everything.

For many customers, TDE (using customer managed keys) offers protection against an internal Azure attack. Again, the likelihood of this scenario is slim, but it’s never zero.

Now What?

So what are our options?

One option is to use SQL Server “Always Encrypted“, but there are implications you must be aware of.

First, you will probably need to make code changes to an existing system. I can’t go into what you have to do because it varies by app, but don’t think you can take an existing application, change SQL Server to use Always Encrypted and expect everything to work. It probably won’t.

In my opinion, if you’re designing a new system, you should seriously consider using Always Encrypted on top of TDE. You can certainly update an existing system to use Always Encrypted, but as noted, it’s not trivial.

Always Encrypted allows you to perform only equality operations over encrypted columns that use a specific version of Always Encrypted called “Deterministic Encryption” so you will need to change the way some of your queries work. SQL Server 2019 adds support for performing more complex queries in a secure enclave, but that is available only in the non-PaaS version of SQL Server.

One final feature to look at is Dynamic Data Masking, it’s not a true security boundary, but it does help mitigate casual snooping.

Wrap Up

For an existing Azure SQL Database system that uses TDE, continue to use TDE, but I would suggest you use keys held in Key Vault if you want 100% control of the keys.

See if there’s an opportunity to move some of the more sensitive fields to take advantage of Always Encrypted. The fewer the number of columns using Always Encrypted, the smaller the chance of regressions.

Big thanks to Andreas Wolter, Shawn Hernan and Jakub Szymaszek from the SQL Server Security and Azure Security Assurance teams for their review and valuable comments.

So you want to learn Azure Security?

A few weeks ago I spoke to a new Microsoft employee who is trying to find his spot in security within the company. What follows is some advice I gave him.

Before I get started I want to share something that serves as the cornerstone for the rest of this article.

Some years ago, I made a comment that if you’re a developer working in the cloud then you need to learn basic networking, and if you’re a networking geek, you need to learn basic programming.

This comment is, in my opinion, as true today as it was when I first made the comment. The worlds of development and networking are deeply intertwined in the cloud and if you want to excel, you really need to understand both.

Now onto my Azure security advice.

Embrace the complexity

First up, cloud infrastructure is complex, so don’t be too concerned if you don’t understand all of it at once. No-one I know understood all of it from the get-go, either. When you do finally understand it, something new or updated will come along anyway! So don’t be disheartened! Just roll with the punches and keep learning.

I set aside a 2-3 hours a week in my calendar labeled ‘Learn’ and I use Microsoft ToDo to track “Stuff to Learn” as I run across items of interest where I feel I should know more.

Right now I have about 20 items on the list, and whenever I come across something of interest, I add it to the list.

Examples in the list include:

Setup an Azure account

If you don’t already have a free Azure account, sign up for one. There is absolutely nothing that can compare with getting your hands dirty. Head over here to get your free account.

Learn the basic network defenses and technologies

Azure has many network defenses, below is a list of some defenses/techs you MUST understand, I would recommend you learn these before you progress:

  • Virtual Networks <link>
  • Network Security Groups <link>
  • Service End-points <link>
  • Azure Private Link<link>
  • Web Application Firewall <link>
  • Azure Bastion <link>
  • Azure Firewall <link>
  • Azure Security Center <link>
  • Azure Sentinel (at least understand what it is) <link>
  • DDoS Protections <link>

Learn the basic application defenses and technologies

Next, you need to understand various application-layer defenses/techs, examples include:

  • Azure Active Directory <link>
  • Setting up Multi-Factor Authentication <link>
  • Azure AD Privileged Identity Management <link>
  • Service Principals and Managed Identities <link>
  • Application Gateway <link>
  • Application Security Groups (they are associated with NSGs) <link>
  • Application-specific ‘firewalls’ (eg; SQL Server, CosmosDB etc) <link><link>
  • Key Vault <link>
  • RBAC <link>
  • Azure Policy and Blueprints <link> <link>
  • OAuth 2 and OpenID Connect <link>
  • Application-specific encryption of data at rest, such as for Storage accounts <link>

Compliance

Another important topic is compliance. Yes, I realize that security != compliance, but it’s a topic you must be versed in. Start here for your Azure compliance journey.

Build Something

Now that you have a basic idea of the core security-related tools and technologies available to you in Azure, it’s time to create something. When I want to learn something I build something.

Some years ago when PowerShell was still in its infancy, I asked Lee Holmes, “What’s the best way to learn PS?” He replied, “You know all those tools you wrote in C/C++/C#? Re-write them in PowerShell!” So I did, and I learned an incredible amount about PowerShell in a short time.

What you decide to create is up to you, but what I’d start with is:

  • Create two VMs in the same VNet, but different subnets – try pinging one VM from the other, does it work? Explain.
  • Using the same VMs, add an NSG to one subnet that blocks all traffic to/from the other VM’s IP address. Can you ping one VM from the other? Explain.
  • Create two VMs in different VNets – try pinging them, does it work? Explain.
  • Encrypt the hard drive of one of the VMs. You will need to create a Key Vault to do this.
  • Take a look at the NSG associated with a VM. Enable Just-in-Time (JIT) access to the VM in Azure Security Center. Now look at the NSG again. Now request JIT access and take another look at the NSG. Explain what happened.
  • Create a Key Vault, add a secret and pull out the secret from, say, an Azure Function. This is quite complex and requires you add a managed identity to the Function or run the function in the same VNet as the Key Vault.
  • If you used a managed identity in the example above, make sure you assign least privilege access to the Key Vault (ie; read access to secrets and nothing else)
  • Create a custom role with very specific actions.
  • Create a blob in a Storage Account. Experiment with the various authorization polices, most notably SAS tokens.
  • Install Azure SQL and configure ‘Always Encrypted’
  • Use Azure Monitor to see who is doing what to your subscription.
  • Set an alert on one of the event types.
  • Open Azure Security Center – look at your issues (red). Look at the compliance issues (PCI etc)
  • Remediate something flagged by ASC.
  • Set a policy that only allows a hardware-backed Key Vault and create a non-HSM KV (ie; not Premium). Use this as a starting point https://github.com/x509cert/AzurePolicy. Remember, it can take 30mins after a policy is deployed to it being effective. I previously wrote about Policy here.

I could keep going with more examples and I will update this list over time!

As a side-note, I often use a resource group named rg-dev-sandbox, when experimenting, that way I can blow the resource group away when I am done, leaving nothing behind.

Go Deep

After you have learned and experimented, it’s time to go deep. Pick a product, say Azure SQL Database, and learn absolutely everything there is to know about security, reliability, compliance and privacy for that product. For a product like Azure SQL, this would include:

  • Access Policies for data at rest
  • Crypto for data at rest (TDE, Always Encrypted, Column Encryption)
  • Crypto for data on the wire (ie; TLS!)
  • Auditing
  • Disaster recovery
  • Secure access to connection strings
  • Azure AD vs SQL Authentication
  • Data masking (ok, not REAL security, but useful nonetheless)
  • Threat Protection
  • Azure SQL firewall (note a lower-case ‘f’ as it’s not a true ‘F’irewall)
  • SQL injection issues and remedies

Consider AZ-500 Certification

I know some people are cynical about certification, but the Azure certifications are not easy and from customers I have spoken to, they are welcome and required. I worked with a large financial organization for over a year and they required their staff working on Azure get certified in various Azure topics. You can get more information about certifications here.

AZ-500 measures Azure security knowledge, and the exam includes labs. I would highly recommend you read the skills outline. Even if you don’t take the exam and get certified, this is a broad set of security-related items you really ought to know.

Wrap Up

I hope this helps you on your journey through Azure security, even if this post only skims the surface!

But remember, as soon as you understand it, something will change, so stay abreast of new features and function by monitoring the Azure Heat Map.

Big thanks to my colleague Ravi Shetwal for his review and feedback.